Python实现Publisher
Publisher创建流程
1. 设置环境和编码
Warning
在编程过程中,必须加上以上两行代码。
#!/usr/bin/env python 用来表示当前为python脚本,如果不加,系统会默认为bash脚本
#coding:utf-8 提供中文支持
2. 创建节点
| rospy.init_node(nodeName)
|
3. 创建发布者
| publisher = rospy.Publisher(topicName, String, queue_size=1000)
|
Tip
第一个参数为topic名称
第二个参数为发布的消息类型
第三个参数为tipic中消息队列最多的数量。
4. 定期发布消息
| rate = rospy.Rate(10)
count = 0
while not rospy.is_shutdown():
# 发布消息
publisher.publish("hello %d" % count)
rate.sleep()
count += 1;
|
完整的示例代码
1
2
3
4
5
6
7
8
9
10
11
12
13
14
15
16
17
18
19
20
21
22 | #!/usr/bin/env python
#coding:utf-8
import rospy
from std_msgs.msg import String
if __name__ == '__main__':
nodeName = "pypublisher"
topicName = "pytopic"
# 初始化节点
rospy.init_node(nodeName)
# 创建发布者
publisher = rospy.Publisher(topicName, String, queue_size=1000)
rate = rospy.Rate(10)
count = 0
while not rospy.is_shutdown():
    # 发布消息
    publisher.publish("hello %d" % count)
    rate.sleep()
    count += 1;
|
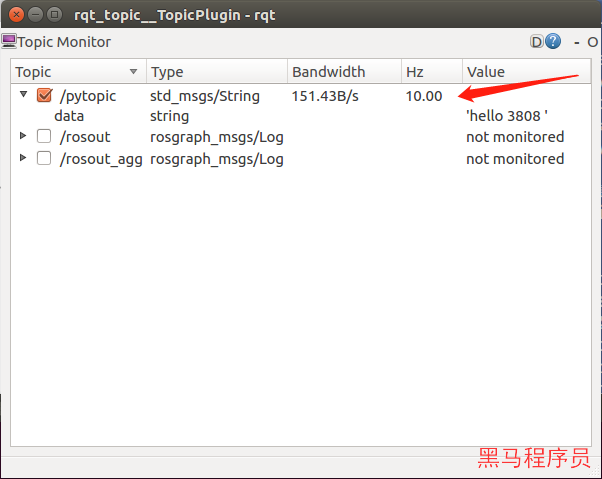
调试发布者
调试Publisher主要是查看是否有发送数据,也就是提供一个订阅的调试工具。ROS提供了命令行工具和图形化工具进行调试。
1. 通过rostopic工具进行调试
查看所有的主题
打印主题所发布的信息
2. 通过rqt_topic工具进行调试
通过命令启动rqt_topic工具
| rosrun rqt_topic rqt_topic
|
选中要调试的主题