C++实现Subscriber
Subscriber创建流程
1. 创建节点
| ros::init(argc, argv, nodeName);
ros::NodeHandle node;
|
2. 创建订阅者
Warning
topicCallback为收到订阅消息时的回调
在此处,必须要用ros::Subscriber进行接收。
否则系统会回收对象。
3. 实现订阅回调
Note
回调函数的格式为const 消息::ConstPtr
完整示例代码
1
2
3
4
5
6
7
8
9
10
11
12
13
14
15
16
17
18
19
20
21
22
23 | #include "ros/ros.h"
#include <iostream>
#include "std_msgs/String.h"
using namespace std;
void topicCallback(const std_msgs::String::ConstPtr &msg) {
cout << (*msg).data << endl;
}
int main(int argc, char **argv) {
string nodeName = "cppsubscriber";
string topicName = "cpptopic";
//初始化节点
ros::init(argc, argv, nodeName);
ros::NodeHandle node;
//创建订阅者
const ros::Subscriber &subscriber = node.subscribe(topicName, 1000, topicCallback);
// 阻塞线程
ros::spin();
return 0;
}
|
调试订阅者
调试Subscriber主要是查看是否能收到数据,也就是提供一个发布的调试工具。ROS提供了命令行工具和图形化工具进行调试。
1. 通过自己编写的publisher进行调试
| rosrun demo_topic cpppublisher
|
2. 通过rostopic工具进行调试
查询主题所需要的数据类型
模拟发布数据
| rostopic pub cpptopic std_msgs/String hello -r 10
|
Note
rostopic pub是模拟发布数据的命令
cpptopic是将数据发送到那个主题,根据自己实际调试的主题来写。
std_msgs/String是这个主题所需要的数据类型,我们是通过rostopic type cpptopic进行查询出来的。
hello是发送的数据,根据自己的调试需求来写。
-r 指的是发送频率
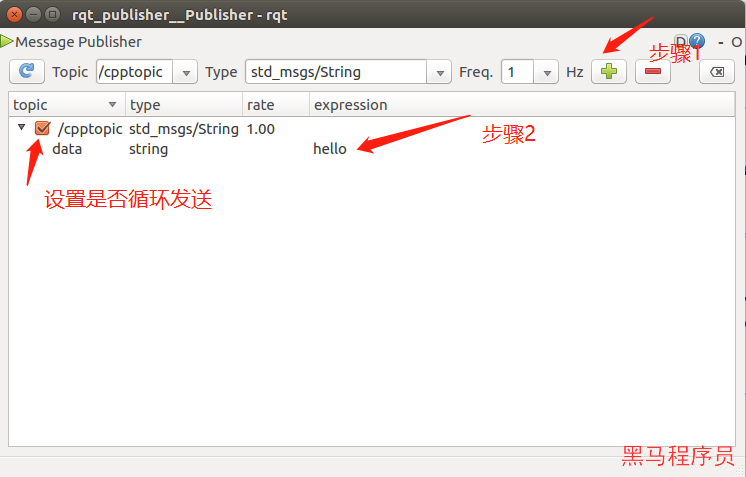
3. 通过rqt_publisher工具进行调试
通过命令启动rqt_publisher工具
| rosrun rqt_publisher rqt_publisher
|